Balloonist Makeover: Max the MacAddict Mascot, Emeritus
Posted Sun, 04 Mar 2007 18:52:44 -05:00
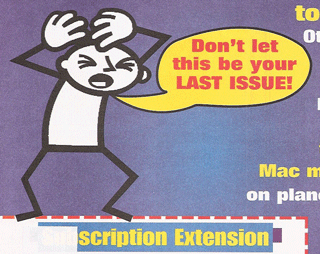
Before: The original renewal form
The first subject of Balloonist Makeover will be a subscription renewal form featuring Max, the former mascot of the former MacAddict magazine.
MacAddict has recently rebranded quite successfully as Mac|Life, and has retired Max.
Although Max's word balloon does contain text, all he really seems to be saying here is Help!
- The outline of the word balloon meanders badly. It was probably drawn by hand using a freeform pencil tool.
- The attribution stem is creepy-big.
- The attribution stem is poking into Max's chin (ouch!)
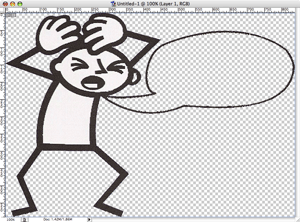
The artwork, cut-out
First, we'll scan in the form and use Adobe Photoshop's Magic Wand to liberate the artwork.
The hard part is over! (We understand Adobe is adding some kind of new & improved wand in CS3. We would find that exciting.) We'll quickly erase the old balloon outline and export the file to PNG using Save for Web.
Next, we'll fire up Balloonist and use the New from Existing Artwork command to load our exported PNG image. To approximate the old balloon, we'll choose the Balloon with Curved Stem tool from the toolbar.
Once we've drawn our new balloon, we'll need to perform the following adjustments:
- While the balloon is selected, drag the focus and root of its stem into acceptable positions. When working at close angles as here, it may be easier to first uncover and select the stem portion of the balloon in the object hierarchy, and then set these properties using the sliders in the resulting Properties Pane. While we're in there, let's widen the stem a little, too.
- If necessary, go back and re-select the entire balloon. Choose a yellow-orange interior color by pulling down the color picker in the Properties Panel.
- Select all the text and chose an appropriate font. We didn't recognize Mac|Life's, but Charcoal seemed close, as well as appropriately Mac-like.
- Select the new balloon's oval in the Object Hiearchy and then use the resulting properties pane to reduce its rectangularness. Balloons with small amounts of text generally look best this way, and there's plenty of room.
- Select the panel in the Object Hierarchy and resize it accordingly. Then use the left-hand side of the color picker in its Properties Pane to make the background periwinkle.
- Draw a selection rectangle around the items in the panel, and position them accordingly.

After: Re-worked in Balloonist
Voilà, a much improved-layout. The stem is admittedly a little long... further improvements could be made be moving the balloon down, and sliding the stem to the top of the balloon, where it would no longer have to stretch around Max's arm and ear.
Technically, the text should also be red-orange. Balloonist doesn't allow you to change text color... yet! But in the meantime, it's a simple matter to export to PDF or SVG and re-import this into illustration software that does.
Balloonist 2.0.1 Update
Posted Sun, 04 Mar 2007 08:50:16 -05:00
This minor release addresses two issues found in version 2.0:
- Changing the page dimensions when there is a single panel that is taller than it is wide no longer causes problems.
- Corrected a mistake in the manual that incorrectly described how to move a balloon and its stems at the same time on Windows.
You can download it from the Balloonist Download Page.