Balloonist is a software application to help layout comics text balloons and panels.
To run Balloonist, you will need a computer equipped with Apple Mac OS X (10.4 or better), Microsoft Windows, Linux, or Solaris.
The Macintosh version of Balloonist requires Mac OS X 10.4 (Tiger) or better.
You should be presented with a Finder window containing the Balloonist
application. With some web browsers, you may first need to double-click the
downloaded archive file, which will have a name like balloonist-2.0.dmg.
Finally, drag the Balloonist application icon to your Applications folder. You should now be able to run Balloonist from your Application folder by double-clicking on it. It may take a while to open.
Balloonist for Windows comes packaged as a zip archive. Windows XP is able to handle zip archives natively, but earlier versions of Windows may require additional archive management software like WinZip (http://www.winzip.com).
Copy your unpacked Balloonist
distribution to the Program Files directory
on your computer using Windows Explorer. This will typically
be located on your c: drive. You should be able to run
Balloonist from here by double-clicking on its
application icon, which will be labeled Balloonist.exe.
If, after double-clicking, you are presented with a toolbar and workspace, then your installation is complete and you may advance to the next section.
If, on the other hand, you receive an alert dialogue, you may need to install additional software. Balloonist requires the Java Runtime Environment to operate. Should you receive a message that Java needs to be installed or "Could not find the main class", dismiss the dialogue and obtain an appropriate Java Runtime Environment.
Balloonist should be able to run on any system capable of operating a version 1.4 Java Runtime Environment or better. Java is installed by default on Solaris, and also ships with most Linux distributions.
Download and unzip the Java Balloonist distribution to your home directory or a subdirectory underneath it.
Once unpackaged, you should be able to open the resulting
balloonist.jar file from your desktop manager.
Some older desktop managers may not have a file association for
Java executables. Others may incorrectly associate them with a zip
archive management application. To manually start
Balloonist, open up a command shell, change to the
unpacked directory using the cd command, and enter the
instruction java -jar balloonist.jar
Java is a framework for safe and portable software applications. Under most circumstances, you shouldn't need to know or care that it's being used.
At release time, Balloonist worked with versions 1.4, 5.0, 6.0, 7.0 and 8.0 of the Java Runtime Environment. Some features are available only under version 6.0 or better.
Java can be obtained at http://www.java.com/
To set a particular Runtime Environment as the
default for OS X, open the utility installed at
/Applications/Utilities/Java/(Java version folder)/Java Preferences
and drag that Runtime first in the preferred Java Application Runtime
list. If no such utility exists, you may need to run
Software Update, which is available under the Apple Menu.
This documentation is available at any time from within the Balloonist Help item under the application's Help Menu.
Balloonist presents documents in an integrated workspace. The central Artwork Pane of this workspace depicts your artwork. It can be edited with items selected from the pull-down menus, or with the vertical toolbar along the left-hand side of the screen.
Figure 2-1. The workspace
A Properties Pane in the upper right-hand corner of the Workspace provides more detailed control over artwork characteristics.
When first started, Balloonist provides a default panel layout. This can be changed from the Properties Pane, or new layouts can be generated from templates under the New sub menu in the File menu.
The Object Hierarchy Pane provides a view of your artwork broken up into a component tree. This tree should allow you to easily select portions of your artwork, even if obscured or too thin to easily click on.
Artwork properties can be edited from the Properties Pane, located in the upper right-hand section of the Workspace.
Fields are linked to the location and dimensions of selected elements. A units dropdown control allows these dimensions to be viewed and edited using different systems of measurement.
If an artwork element is contained by a panel, its position coordinates will be specified relative reference frame of that panel.
If multiple items are selected, the Properties Pane will do its best to average their properties.
Although Balloonist allows artwork elements to be positioned to a very specific number of decimal places, we suggest you refrain from doing so. Instead, concentrate on aligning your artwork elements to make them look best.
Balloonist's Layout Properties Pane can help simplify the task of panel layout by automatically adjusting several panels at once.
The Properties Pane becomes available when no artwork elements are selected. If there is an active selection and you would like to release it, choose Select None from the Edit menu, or choose the Selection tool from the toolbar and click outside the drawing area.
Changes to any of the fields in the Layout properties pane will typically result in an automatic re-layout of your artwork's panels. If you are unhappy with any of the changes, you can always Undo them from the Edit Menu.
Automatic Layout may also be turned off from the Page Properties Pane.
The layout itself is depicted in the artwork pane as a light gray rectangle behind the panels, with a gray outline. The margin fields control whitespace located between the layout and the edge of the page.
The layout's width and height are determined by the page dimensions and the layout's margins.
Figure 2-2. Layout in the Artwork and Properties Panes
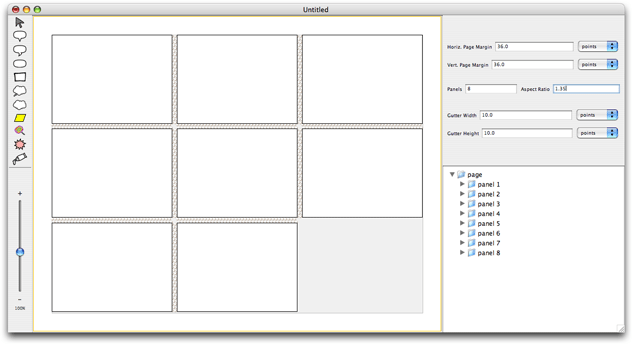
The number of panels can also be specified. While panel layout is set to automatic, picking a number of panels that is greater than the existing panel count will result in the implicit addition of new panels. If you specify a smaller number, panels will be removed backwards in sequence from the end of the list in the Object Hierarchy. Again, you can always Undo layout operations, which lets you easily recover any panels that have been inadvertently removed.
Other fields set the aspect ratio (or shape) of panels, and the default dimensions of the gutters between them. Higher aspect ratios correspond to wider panels.
Since it overrides any changes that have been made to individual panels, you will typically want to customize layout early on in your artwork's lifetime.
To change the overall dimensions of your artwork, you can select the outermost and uppermost node in the Object Hierarchy Pane, titled "Page".
In addition to width and height fields, this Property Pane also provides radio buttons that can used to deactivate or reactivate automatic panel layout.
When you start Balloonist, the Selection Tool is active in the Toolbar. The Selection Tool looks like an arrow and allows you to select balloons and their sub-components.
Other more conceptual artwork elements, like panels, must be selected from the Object Hierarchy Pane.
The other tools in Balloonist's toolbar are used to create artwork elements.
Table 2-1. Toolbar Legend
| Word Balloon | |
| Word Balloon with a Curved Stem | |
| Stemless Word Balloon | |
| Panel | |
| Thought Balloon | |
| Stemless Thought Balloon | |
| Narration | |
| Lollipop | |
| Starburst | |
| Gouache |
If you use the mouse to position the pointer over one of the toolbar buttons, a tool-tip will momentarily appear, identifying the associated artwork element.
At the bottom of the toolbar, you should see a vertical slider control. This is the Zoomer. As you slide the Zoomer up and down, the view in the Artwork Pane is scaled without permanently affecting your artwork. A percentage beneath the slider indicates the selected display magnification.
You can always return to a 1:1 scale by choosing the Actual Size command from the View Menu.
Balloons are a common dialogue element in comics. They typically consist of text circumscribed by an outline. This dialogue may be spoken or unspoken.
Stems refer to pointers emanating from balloon perimeters. Stems attribute dialogue to one or more characters. Some people use the term "tails" to describe this feature.
Balloon outlines often consist of ovals. The character of these ovals vary widely, a fact which has complicated the use of software in their generation.
Balloonist tries to reproduce as much of this diversity as possible by allowing users to alter the rectangularness of these ovals.
Comics generally distinguish Thought Balloons from Speech balloons with round ruffles and bubbled stems. Balloonist follows these conventions when initially creating artwork elements, but allows you to change them afterwards.
Starbursts exhibit a jagged style of ruffling.
Some comics feature an unbordered style of word balloon attributed by a simple straight line. Balloonist calls these balloons Lollipops.
Narrations are parallelogram-shaped balloons used to describe events or place them in context.
Gouache can be used to replace the text in balloons from scanned art. Applying gouache results in a lettered and unbordered white oval. This may be useful for language translation, scanlation, or perhaps those replace-the-dialogue contests in the newspaper and certain curmudgeonly blogs.
New artwork elements, balloons included, are automatically selected upon creation. The unstemmed portion of a balloon that has been selected will appear nestled within a translucent blue rectangle.
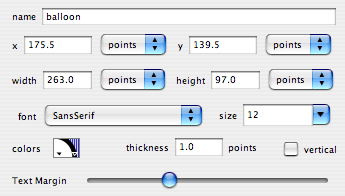
When a balloon is selected, the Properties Pane displays a number of specialized controls for its configuration.
Figure 2-3. Balloon properties
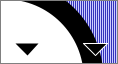
A color chart tool allows you to change the colors of the outline and interior of some selected elements. Color chart tools depict a filled arc. To change the balloon's interior color, click and pull-down the filled portion of the arc. The change the balloon's outline color, click and pull-down the outline portion of the arc.
Figure 2-4. A color chart tool
You may also change the thickness of a balloon's outline. Unlike other properties, outline thickness is always measured in points, and may not exceed 5.0.
Text for selected balloons can be edited and styled in the Properties Pane's text area, which can be found at its bottom. To add or revise balloon text, click the mouse at the desired location and start typing or entering text using another input method. Text can be selected, copied, cut, and pasted from the text area in the same manner as in other applications.
Dropdown boxes in the Properties Pane allow you to change the font family and size of selected text. Certain fonts will be replaced if pasted into other software applications or exported to PDF format. The names of these fonts are italicized and colored in the font family dropdown control. For best results, stick with fonts whose names are not italicized.
The default font for new balloon text can be configured using the Preferences command.
The Format pull-down menu can be used to provide boldfacing, italics, or underlining. It can also be used to remove these attributes.
You can override the natural layout of text within your balloons by inserting newlines into them. To do this, click on the desired location in the text area and then press the Return key.
The Vertical checkbox can be used to orient text from top-to-bottom and right-to-left. This is most useful for Chinese and Japanese writing, but can be used with text in any language.
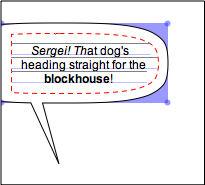
Text is offset from the exterior of its balloon by configurable margins. When a balloon is selected, the Artwork Pane illustrates this using a balloon yolk. Balloon yolks are indicated by a dashed, red oval.
Figure 2-5. A balloon yolk
To break balloon text across several sections when there is more than one shape, use the tab key. You can consolidate shapes within a balloon using the Merge command, or the Object Hierarchy.
Clicking a balloon's disclosure triangle or plus sign in the Object Hierarchy will usually reveal that it is a container for one or more shapes. These shapes can be selected by clicking on their names in the Object Hierarchy.
Attributes of selected shapes can be adjusted using the Properties Pane. These attributes can include background color, outline color, rectangularness, location, dimensions, and name.
Figure 2-6. A rectangularness slider

Shapes can be re-arranged by dragging them to a new location in the Object Hierarchy. Shapes can be relocated within and amongst balloons. They may not be moved outside balloons.
The height and preferred width of any balloon ruffles (or prongs) can be changed from the Ruffles tab in a selected balloon's Properties Pane.
Figure 2-7. The Ruffles Property Pane
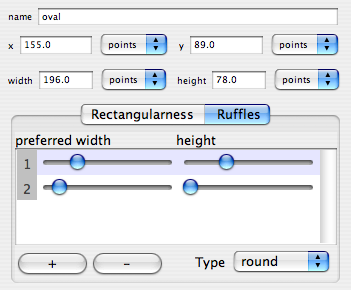
The plus button at the bottom of the pane can add up to ten ruffle harmonics. To delete a ruffle harmonic, click on its number in the list to hilight it, and then press the minus button.
Another dropdown control, at the rightmost portion of the pane's bottom, allow the ruffle type to be varied from round to jagged.
Thought balloons and starbursts have ruffles by default. Ruffles may also be added to other balloon ovals.
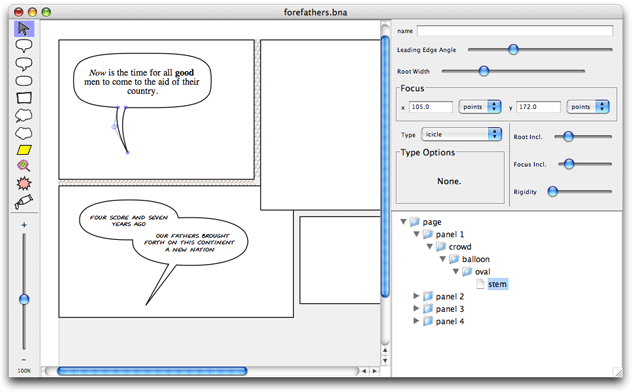
Clicking on a shape's disclosure triangle or plus sign in the Object Hierarchy will reveal any contained attribution stems. Stems are characterized by a root, which is the part where the balloon and the stem touch, and a focus, which is the most distant point on the stem and generally also the thinnest. Balloonist sometimes refers to the leading edge of a stem. This is the first point on the stem's root that is encountered when tracing around a clock face, clock-wise, from 3 o'clock.
The Properties Pane can be used to adjust the focal points, root, width, style, and curvature of selected stems.
Figure 2-8. Stem properties
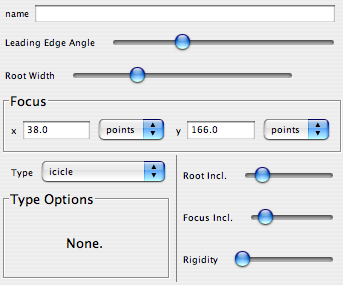
Balloons supports three types of stems: icicle, bubbled, and lollipop. When a selected stem is bubbled, the user is presented with an additional slider in the type options area of the Stem properties pane. This slider can control the density of the bubbles.
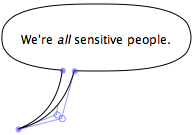
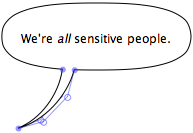
Starting with version 2.0, Balloonist can curve stems. The easiest way to produce a curved stem is by using the Word Balloon with a Curved Stem tool in the toolbar.
Fine control over stem curvature can be achieved using three sliders in the bottom righthand portion of the Stem properties pane. The top two of these sliders control the inclination at the root and focus of the stem. When a stem is selected, manipulating the inclination sliders will rotate special tangent lines in the artwork pane. The stem's curve will follow those tangent lines at each end.
Figure 2-9. A Curved Stem
The inclination sliders are also useful for jimmying around the bubbles in a bubbled stem.
When starting from an uncurved stem, you will need to adjust both inclination sliders before you will notice any curvature.
The rigidity slider lets you flatten a curved stem.
Figure 2-10. A Curved and Flattened Stem
The toolbar offers most balloons in stemmed and unstemmed varieties. Additionally, stems can usually be added later using the Item Menu.
Like shapes, stems can also be rearranged using the Object Hierarchy Pane.
The Merge command under the Arrange Menu can be used to merge the shapes from several balloons into one. This operation can be reversed with the Part command.
After clicking in the text area, you can use the tab key to break text across sections in a merged balloon.
Figure 2-11. Merged Thought Balloons
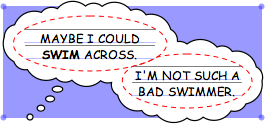
Upon merging, the newly-composed balloons sections are implicitly ordered spatially, so that text flows as appropriate to its vertical or horizontal orientation. This operation can also be performed later from the Arrange Menu, should subsequent relocations upset proper flow. Text flow amongst sections can also be established manually, by dragging and dropping shapes in a balloon's node in the Object Hierarchy.
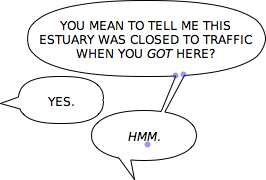
To tie two merged balloons together, simply add a stem to one and drag that stem's focus into the body of the other.
Figure 2-12. Tied Word Balloon Ovals
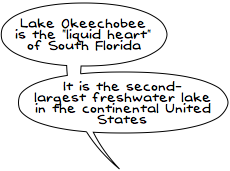
You can also use merging to skewer an oval on another oval's stem.
Figure 2-13. A Skewered Balloon Oval
The artwork elements described so far can be placed inside panels. Panels are generally rectangular shapes that comics use to group together coincident events.
Panels clip contained artwork elements. This means that any portion of a contained artwork element will be hidden from view, as if it were in matted picture frame.
Figure 2-14. A Balloon Clipped by a Panel
Balloonist will attempt to arrange text in clipped balloons so that it is not clipped, and so that it doesn't overlap its panel's inner margin. When a panel is selected, its inner margin can be configured from the Properties Pane.
If you want an artwork element to appear as though it's inside a particular panel, but you don't want the artwork element to be clipped, you may place the artwork element inside the outermost, page element, and position then it over the desired panel.
Newly-created Balloonist documents have a default arrangement of panels. The particulars of this arrangement will vary depending on the kind of stationery used to create the document. Stationery is available under the File Menu's New submenu.
When no elements are selected in the Artwork Pane, the Properties Pane allows the default panel arrangement to be quickly reconfigured.
To avoid complicating the selection of balloons and images, panels cannot be selected from the Artwork Pane. Instead, they must be selected from the Object Hierarchy Pane. The Properties Pane can be used to reshape selected panels, or to alter their inner margins. Selected panels may also be resized by clicking and dragging their corners and sides in the Artwork Pane.
If an artwork element is contained by a panel, its coordinates are specified relative to that panel.
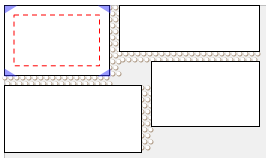
Balloonist implicitly recognizes the interstitial space between panels as Gutters. Gutters are depicted with a pattern resembling the dimpled surface of toy blocks.
Figure 2-15. Gutters
Gutters can be easily moved around by pressing the mouse and dragging on them. They do not need to be selected first.
Panels on either side of a re-located gutter will be resized to accommodate its new placement.
A Crowd is a special container used to group together balloons so that their text will remain aligned relative to each other. Balloonist will prevent the text inside crowded balloons from overlapping.
Crowds cannot be created directly. Whenever a balloon is created inside a panel, Balloonist will implicitly create a Crowd for the new balloon, if one is not already present.
If you would prefer a balloon to obscure the text in its overlapped counterparts, you can move it outside its crowd by dragging and dropping it in the Object Hierarchy Pane, or by cutting and pasting.
Crowded balloons will respect each other's margin settings. Margins of selected balloon can be changed using the Properties Pane.
Balloonist allows you to add image content to your artwork via the Place commands under the File Menu. Placed images can be linked or embedded.
By default, only files with an extension identifying them as JPG, PNG, or GIF content will be selectable in resulting file dialog. To override this behavior, hold down the option key (Mac OS X) or alt key (other operating systems) when you activate the desired menu item.
When you save your artwork, Linked images will
be stored as Uniform Resource Locator (URL) addresses. These should be familiar
from web browsers, and can be expressed using a variety of protocols. These
protocols include http and ftp for images on the
World Wide Web, and file for images on your local file system.
When you change a URL address, or re-open a saved document, linked image URL's will be consulted to obtain image content.
Embedded images are actually saved, pixel for pixel, with your artwork. Embedded images also feature a URL address, but it is only provided for reference.
The Properties Pane can change the URL address of selected images. It also permits you to toggle them between linked and embedded states. Be warned that changing an image from embedded to linked will cause any cached image content to be lost.
If nothing is selected, a placed image will be dropped onto the page, behind any panels. If a panel is selected, Balloonist will place the image inside that panel. If an artwork element is selected, the image will be placed inside the same panel that contains that element.
When resizing an image by dragging one of its corners, you can maintain the image's aspect ratio by holding down the shift key.
If an images becomes sheared and you'd like to restore its original aspect ratio, use the Reset Width or Reset Height button in the Properties Pane.
Artwork elements are automatically selected upon creation.
Artwork elements can be deselected by clicking within an empty region of the document, or by choosing the Select None item from the Edit Menu.
To select an element that is not currently selected, use the mouse to move the cursor over that element, and click once.
Alternately, elements may be selected by clicking on their names in the Object Hierarchy Pane.
To select multiple elements, you may use the Shift key in combination with the methods above. If nothing is selected, you may also select multiple elements by pressing the mouse and dragging a selection rectangle around elements in the Artwork Pane.
Selected elements can be relocated by positioning the mouse cursor over them, pressing the mouse button, and dragging the mouse to a new location. This motion can be constrained to a particular axis by holding down the Shift key.
Most selected elements can be resized by dragging their sides and corners in the Artwork Pane. The cursor's appearance will change when positioned over these spots of a selected element. Resizing can also be constrained using the Shift key.
Properties of selected elements can be changed using the Properties Pane.
Components of selected stems (or the stems of selected balloons) can also be relocated from the Artwork Pane. The mouse cursor will change its appearance to indicate when it is positioned over a stem or its focus.
When you move a balloon, the focal points that its stems point to ordinarily remain fixed. To move stem focal points along with their balloon, hold down the Command key when using Mac OS X, then press and drag as before. On other platforms, use the second mouse button to re-locate a balloon and its stems together.
To resize a stem root, select its stem and use the root width slider in the Properties Pane.
The Object Hierarchy Pane presents a tree view of your artwork elements. Containers are represented by folder icons. These can be opened to reveal contents by clicking the accompanying disclosure triangle (Mac OS X) or plus sign.
Artwork elements may be selected by clicking on their companion icons or names in the Object Hierarchy Pane. Similarly, selections made in the Artwork Pane should also be reflected here.
Artwork elements can be clicked, dragged, and relocated within the Object Hierarchy Pane, with some restrictions. A shape can only be located within a balloon, and a stem can only be located inside a shape.
Artwork elements can also be reorganized using the commands under the Arrange Menu. Bring Forward, Send Backward, Bring to Front, and Send to Back each affect which portions appear "on top" when artwork elements overlap. This is sometimes referred to as z-order. Properly expanded, the Object Hierarchy represents the sequence of artwork elements.
Most operations in Balloonist can be undone and redone using the items under the Edit Menu.
In addition to the zoomer, the View Menu can also be used to change the magnification level of the Artwork Pane.
If the view is scaled such that your units of choice would appear reasonably large, you can reveal rulers by resizing the application window to larger than your artwork.
When you are done using Balloonist, you can end your session using the Quit command. On Mac OS X, Quit is located under the Application Menu. On other platforms, it can be found under the File menu.
The File Menu provides commands to generate new artwork using the default layout, from stationery, or with a single panel displaying an existing image file. The commands to start from existing images work like their counterpart commands to place images.
Balloonist artwork can be opened and saved using items under the File Menu. All artwork elements, including text, balloons, and any embedded image content, will be saved with your document.
New documents will default to the file extension bna.
We recommend keeping this file extension, since some platforms
require it to associate documents with Balloonist.
You may save a copy of a document using a new name with the Save As command under the File Menu.
Fonts are not embedded within Balloonist documents. You will receive a warning upon opening any document that uses fonts that are not available on your system. References to unavailable fonts will be implicitly mapped to the default font as set in your user preferences. If you save a file after font references have been replaced, the old font references will be lost.
There wouldn't be much point to producing artwork in Balloonist if you couldn't share that artwork with the outside world. Consequently, Balloonist can print your artwork, export it to a number of standard file formats, and copy and paste portions of it to familiar graphics software applications.
Artwork can be printed by choosing the Print item under the File Menu. If your artwork is taller than it is wide, it will be printed using portrait orientation. If your artwork is wider than it is tall, it will be printed using landscape orientation.
Alternately, artwork can be exported to another graphics software application, such as Adobe Reader, and printed there. This can be helpful if your printer can't handle the size of your artwork, and you would like to scale the printed image to fit on a single physical page.
When printing directly from the software on Mac OS X, Balloonist will nudge panels that are positioned at fractional point coordinates to whole number coordinates. This corresponds to a distance smaller than 0.353 millimeters, and is not generally noticeable. Nevertheless, if you'd prefer to avoid the limitation, you can print from another application after Exporting As PDF from the File Menu.
Using the Export item under the File Menu, Balloonist lets you to write your artwork to PDF, SVG 1.0, or SVG 1.2 vector formats. You may also generate PNG images.
Adobe Portable Document Format (PDF) is an established industry standard that is well supported by print shops and publishers.
Scalable Vector Graphics (SVG) is a newer, more open standard. SVG 1.0 is already in widespread use. SVG 1.2 has not yet been fully defined, but will feature more sophisticated support for wrapped text. Balloonist's support for SVG 1.2 should be considered experimental.
SVG can be used by many graphics software applications, including Adobe Illustrator and Inkscape. SVG support is also being built into next-generation web browsers.
SVG handles fonts less rigidly than PDF does, which can be useful for working locally with certain fonts.
Mac OS X users may also generate PDF files from the dialog box reached from the Print command. This option is affected by the whole number panel coordinate restriction that also affects printing directly from the software on Mac OS X.
Other export options allow you to generate image files. All Balloonist deployments offer output in Portable Network Graphics (PNG) images. PNG is a handy, compact image format supported by most modern web browsers.
If you have Java 6.0 or better installed, you can also export images in Graphics Interchange Format (GIF).
Balloonist also includes basic support for importing comics represented in ComicsML definition language. This support is available from the File Menu.
Once selected, portions of Balloonist artwork can be copied and pasted to any graphics software application with clipboard PDF support. These include Adobe Illustrator and CorelDRAW.
Unadorned text copied from Balloonist without its parent balloon can be pasted into most software applications.
On most platforms, text located inside balloons can be pasted to other applications and exported to PDF format in a manner that will allow it to be edited later. This flexibility may come at the expense of rendering accuracy if the destination application does not support the same fonts and text characteristics that Balloonist does.
On platforms where this functionality is available, it is the default behavior. The Preferences command allows you to request that Balloonist instead work to preserve the accuracy of pasted text at the expense of its editability. This option causes text too be pasted and exported to PDF format as vector glyphs.
Certain fonts will usually be replaced when pasted into another application or exported to PDF. Fonts with this restriction are italicized and colored in the font family dropdown control. On Mac OS X, these include fonts stored in suitcase files, which typically have no file extension and a file type code of "FFIL".
Often, this limitation can be overcome by exporting artwork to SVG format.
On Mac OS X, the Preferences command can be found under the Balloonist Application Menu. On other platforms, it is located under the Help Menu.
The Preferences command brings up a Preferences Window. This Window is sub-divided into Text and Shape tabs. As you change various defaults, you can see their effect on a sample balloon.
The Text Tab lets you change the default font for balloon text. To revert back to the shipping default font, click the Reset button.
The Text Tab also provides control over the transmission of text to other software applications through a Preserve dropdown.
This dropdown affects Copy and Paste, as well as the Export As PDF command under the File Menu. It has no effect on the Mac OS X Print Dialog's Save as PDF feature, Adobe Acrobat Distiller, or any other external method for PDF Export.
Users running Java 6 will also be provided with an option to kern text. Kerning employs special information stored within a font to adjust the horizontal spacing of particular character pairs (for example, "A" and "V" or "T" and "o") to use space optimally.
The Shape Tab establishes default characteristics for the shape and outline of balloons. Sliders control default rectangularness, color, text margin, and line thickness.
The authors are not responsible for any damages resulting from the use or misuse of this software. Balloonist is offered without warranty under a GNU GPL v2 license.
There is a problem on Max OS X that results in the incorrect layout of balloons that mix Arabic and Roman text. Because Mac OS X will implicitly substitute characters missing from one font with characters from another, this may also result in problems when entering only Roman characters using an Arabic font, or vice versa.
Users of Mac OS X 10.4 may experience unwanted tiny, white rectangles in regions of placed images. This problem can be resolved by changing the default Java implementation to Java 2 Standard Edition 5.0 (also sometimes known, confusingly, as "Java Runtime Environment 1.5") or better. This is the default Java version as of Mac OS X 10.5 (Leopard.)
Apple provides a utility to set Java 5.0 or better as the default.
Unfortunately, text cannot be editably exported to PDF, or editably copied-and-pasted to other applications, on Mac OS X 10.5 (Leopard). Instead, text will instead appear as uneditable vector glyphs at the destination. To workaround, export artwork to SVG, instead.